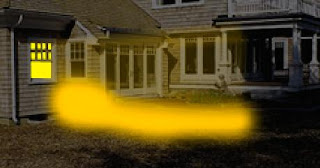
For today I chose to show you how to transform a picture taken in the day light and turn it into night time. Then I'll show you a easy way to make light beams shooting out the house and make them reflecting out on the grass.
Choose a picture with a house. I chose this one:
 Open it in Photoshop. Duplicate the layer – it’s a easy way to come back from where you start.
 Hold down ALT and the press the Adjustment layer icon and select Layers.
 Tick the box that says: "Use Previous Layer to Create Clipping Mask".
Always use that when you want your adjustments to affect only the first layer below.

Now go to the bottom of the Levels control and just clik on the white slider and move it to the left. Now you're making the sun go down. :)

It looks like that:

The sky looks too bright so I select it and I did the step above again.

If you’ll zoom in a little you’ll notice that around the house and among the trees you can still see a little bit from the blue sky from earlier.

Go to Filter – Other – Maximum. Increase the radius to get rid of the outline. You did the selection larger without going to Select- Modify – Expand and then apply the filter again.
Using the Polygonal Lasso tool make the selection of a window.

 Choose now a yellow color as foreground from the Color picker and fill.
 Make a new layer and using again polygonal tool to something like this:
For the color use orange. Lower the opacity of this layer :
 Do the same with the other two little windows from the left, each one in separate layer. Lower the opacity to these layers too.
If you think that the “light” is not quite at the beginning of the window you can press CTRL + T (or go to Edit - Transform) and then press right clik and choose Distort.

Now you can select all three layers by holding down CTRL and press each one and then press CTRL+E to merge them into a single layer.

Because the line of the light is too sharp you can apply Gaussian Blur.

I'll make a gradient over the light beams in order to make the light fade away.
Make sure your active layer is the one that contains the light. Press the Add vector mask icon and then press the icon mask to select it so you can apply a gradient just over the light and not to the hole image.

Choose the first gradient from Gradient tool (black to transparent) and start dragging from right to left.

Reduce the opacity of the layer if you want and you can distort the hole layer if you thing it’s not just like you wanted.
Now let’s do the light reflected on the grass.
Pretty easy to make it after I’ve seen somebody else doing it :P. All you have to do is to select the brush tool (create a soft brush) and just paint down like this :
 Lower the opacity and apply Gaussian Blur to fade it.
 Here you are :


No comments:
Post a Comment